Windows Setup for the Phoenix
Description:
-
You will get a quick reminder how to log into the remote network via the Cisco VPN client (basic level)
-
You will learn about the installation and use of the program WinSCP (basic level)
-
You will learn how to use WinSCP to copy your first jobfile onto the Server (basic level)
-
You will learn about the installation and use of the program PuTTY (basic level)
-
You will learn how to use PuTTY to start your first sample jobfile (basic level)
Connecting to the remote network via the Cisco VPN client
This tutorial will introduce the tools WinSCP and PuTTY, which are very useful when working with a remote server from a Windows PC.
Please note however: You need to be connected to the remote network via a VPN client. We recommend the use of the Cisco AnyConnect Secure Mobility Client.
You can download the client by logging into your TU Braunschweig user account on the following website: https://vpngate.tu-braunschweig.de/+CSCOE+/logon.html#form_title_text
On the next page, you can download the installation file as well as display instructions regarding the installation process. 
(Alternatively, you can also manually install the client by downloading the file „anyconnect-win-<Version etc.>.msi“ on the following homepage: https://www.tu-braunschweig.de/it/downloads/software)
Finish the installation and connect to the remote server. When first starting the client, you need to type in the connection details as followed:
-
Connect to:
vpngate.tu-bs.deorvpngate.tu-braunschweig.de -
Group:
Tunnel TU Traffic(recommended) orTunnel all Traffic -
Username and Password: The login details of your TU Braunschweig account
For a more detailled tutorial visit: https://books.rz.tu-bs.de/books/vpn/chapter/vpn-einrichten (German only)
Installing and using WinSCP
Description
Official description: „WinSCP is an open source free SFTP client, FTP client, WebDAV client, S3 client and SCP client for Windows. Its main function is file transfer between a local and a remote computer. Beyond this, WinSCP offers scripting and basic file manager functionality.“ Source
This means that WinSCP allows the user to access a remote server (such as the Phoenix-cluster) with the purpose of transfering files between the user's home computer and the server file system. This can be done by navigating through a graphic user interface (GUI) that allows the user to access files just like they are used to on their local machine, for example dragging and dropping files into their file-system on the server.
WinSCP therefore provides an easy alternative for Windows users who are less comfortable navigating the Linux command line interface.
Download and installation
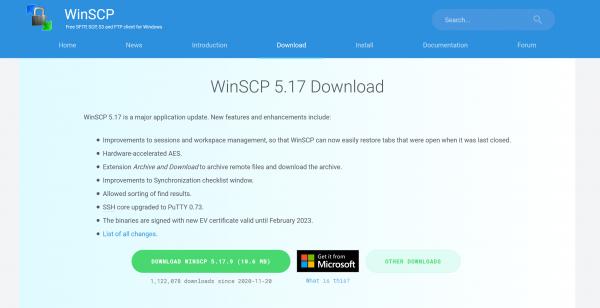
In order to download the installation file, please visit: https://winscp.net/eng/download.php
Start the installation file and click through the steps to finish the setup. Then, start the program.
Login
Before loging in, please make sure that your VPN is active and you are connected to the remote network of the TU Braunschweig.
In the following window, you will be asked to enter your login data. If the login window does not appear automatically, please click on „New Session“.
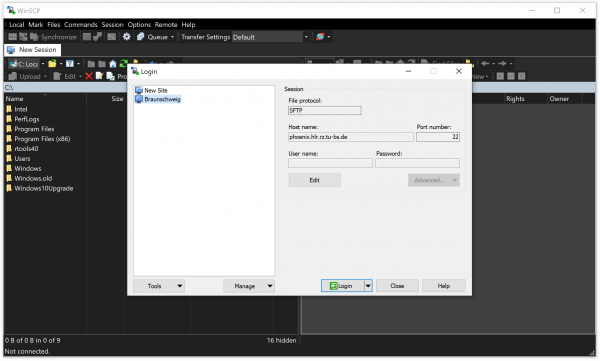
Type in the following information:
-
File Protocoll:
SFTP -
Host Name:
phoenix.hlr.rz.tu-bs.de -
Port Number:
22 -
Username and Password: The login details of your TU Braunschweig account
Uploading files to the server
You should now see the file system of your local machine on the left and the content of your remote directory on the right.
Let's now create a sample jobfile called ExampleJob.job and upload it to our remote file system. The jobfile, which does nothing at all, looks as followed:
#!/bin/bash -l

#SBATCH --partition=standard
#SBATCH --nodes=1
#SBATCH --time=01:00:00
#SBATCH --job-name=TestJob
#SBATCH --ntasks-per-node=1

sleep 1h
Please note: In order for jobfiles to be recognized and executed by the Linux server, the file needs to be encoded as a Linux file.
One simple way to achieve this, is the use of the handy text editing tool Notepad++. Simply download it via the link provided, open the jobfile, click on Edit in the navigation bar and then on EOL Conversions. There select the option Unix (LF).
Once you ensure that the file has the right encoding, you can drag-and-drop it onto the right side of the WinSCP interface either from its left side or Windows native File Explorer. You should then see your file appear in your remote folder as you can see in the following screenshot:
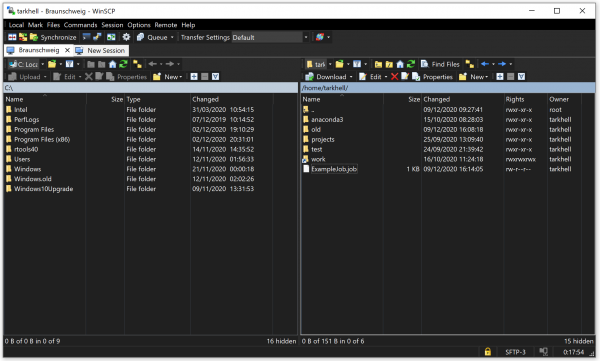
You have sucessfully placed your jobfile on the server in the directory /home/username/. Unless otherwise specified, this is also the folder where the output-file of the submitted job will be saved later.
You are now ready to submit the job via our next application, PuTTY.
Installing and using PuTTY
Description
Official description: „In really simple terms: you run PuTTY on a Windows machine, and tell it to connect to (for example) a Unix machine. PuTTY opens a window. Then, anything you type into that window is sent straight to the Unix machine, and everything the Unix machine sends back is displayed in the window. So you can work on the Unix machine as if you were sitting at its console, while actually sitting somewhere else.“ Source
This means that PuTTY allows you to execute Linux command line commands on the remote server from your own home PC. This allows you to submit and monitor jobfiles and perform numerous other tasks.
As PuTTY does not provide a GUI, you are required to know about the basic functionality of command line interfaces. For more information on command line interfaces and submitting jobfiles, please read the other pages of this book.
Download and installation
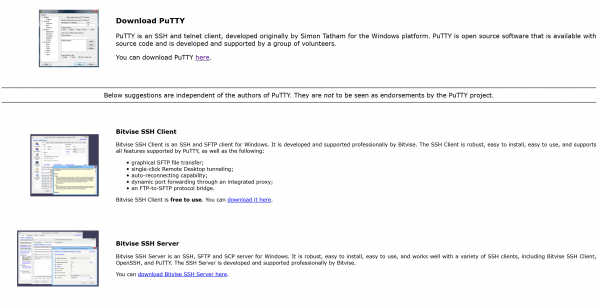
In order to download the installation file, please visit: https://www.putty.org/
Start the installation file and click through the steps to finish the setup. Then, start the program.
Login
Before loging in, please make sure that your VPN is active and you are connected to the remote network of the TU Braunschweig.
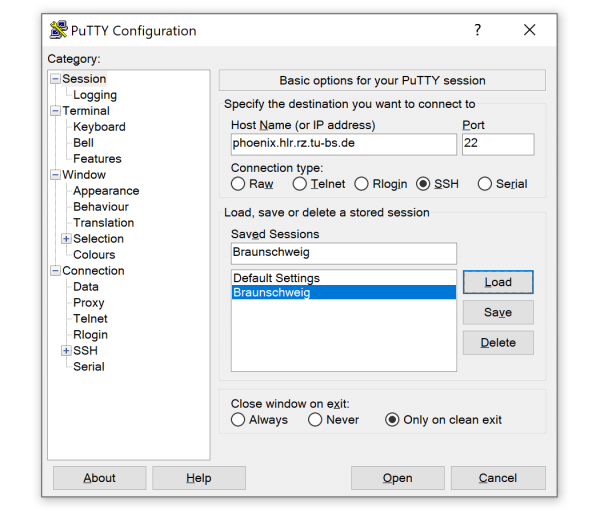
In the first window, you will be asked to enter your login data.
Type in the following information:
-
Host Name (or IP address):
phoenix.hlr.rz.tu-bs.de -
Port Number:
22 -
Connection Type:
SSH
You can save this session data to make it easier to log in next time. Start the saved session by double clicking it or via the Open button.
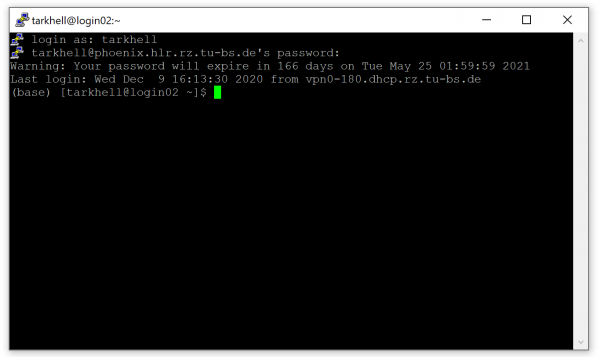
In the following window, you will be asked to enter your login data. Please type in the login data of your TU Braunschweig account.
Using the command line interface by submitting our jobfile
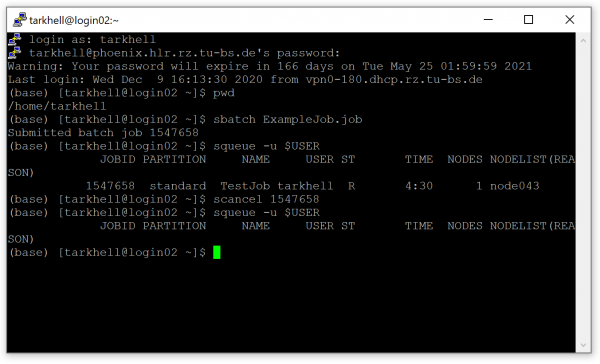
We now want to start the jobfile we added to the directory /home/username/ earlier via WinSCP. Let's therefore first test if we are currently in the right directory with the following command:
pwd
It should display the correct folder, namely /home/username/. This means we are in the right folder and can start our jobfile named ExampleJob.job via the following command:
sbatch ExampleJob.job
The resulting output should be similar to the following: Submitted batch job 1234567.
If you instead see an error that the files contain unknown characters, you might have forgotten to change the encoding of the file to be compatible with the Linux server. In this case, please see the section about WinSCP where the tool Notepad++ is introduced.
Now that the job is submitted, we can monitor all of our submitted jobs on the server with the following command:
squeue -u $USER
The output should now contain some information about your job such as the job-ID, your username and the time passed since the job was started.
Please note: The column ST shows the status of the job. If the job is started, it will display R for Running. If it instead shows PDfor Pending, it means that all nodes are currently occupied and that you need to wait until a slot opens. For more information about the queuing system SLURM, read the dedicated page in this book.
Since our job is just blocking a node without doing anything, let's cancel it with the following command after filling in the correct job-ID:
scancel 1234567
If we now once again check our current jobs via the command above, it should no longer be visible.
If you have done everything correctly, your PuTTY console output should look a little like this:
To see the output of your job, you can revisit the folder /home/username/ in WinSCP. It should now contain a file called slurm-1234567.out (with the correct job-ID) with approximately the following content:
slurmstepd: error: *** JOB 1234567 ON node043 CANCELLED AT 2020-12-09T17:04:17 ***
For other applications, this file will usually contain more information.
Conclusion
Congratulations! By following this tutorial, you have now installed all the required software and also uploaded and submitted your first jobfile.
This should teach you the basic skills needed to use the Phoenix server from your local Windows PC.
You can use your folder system to upload jobfiles, scripts and even programs such as Anaconda to be able to use your own Python version.
For more information about jobfiles, please visit the other pages of our tutorial.
Enjoy working on the Phoenix cluster!

No comments to display
No comments to display