# 2. Erste Schritte

Anmeldung, Navigieren im Benutzermenü, Abmeldung

# 2.1 Anmeldung in SAP ERP

<span style="font-size: 10.0pt; font-family: 'Arial',sans-serif; mso-fareast-font-family: 'Times New Roman'; mso-ansi-language: DE; mso-fareast-language: DE; mso-bidi-language: AR-SA;">Nach der Anmeldung am Rechner ist als nächstes die Chipkarte in das Lesegerät zu stecken. Dann ist das Zertifikat auszuwählen, das SAP verwenden soll. </span>

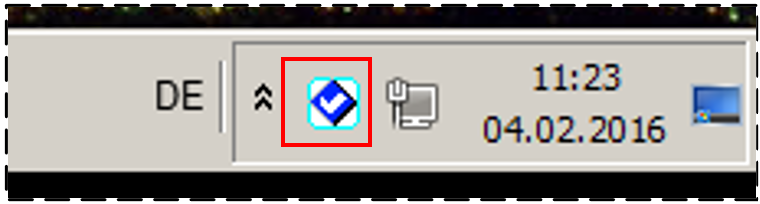
<span style="font-family: 'Arial',sans-serif;">Dazu gibt es unten rechts in der Taskleiste das Symbol </span>[![image.png](https://books.rz.tu-bs.de/uploads/images/gallery/2025-11/scaled-1680-/08dDJ6WStTsmr6Nj-image.png)](https://books.rz.tu-bs.de/uploads/images/gallery/2025-11/08dDJ6WStTsmr6Nj-image.png) <span style="font-family: 'Arial',sans-serif;">(eventuell ist es auch ausgeblendet):</span>

<span style="font-family: 'Arial',sans-serif;">[![image.png](https://books.rz.tu-bs.de/uploads/images/gallery/2025-11/scaled-1680-/z7twUFdF70nRWD6s-image.png)](https://books.rz.tu-bs.de/uploads/images/gallery/2025-11/z7twUFdF70nRWD6s-image.png)</span>

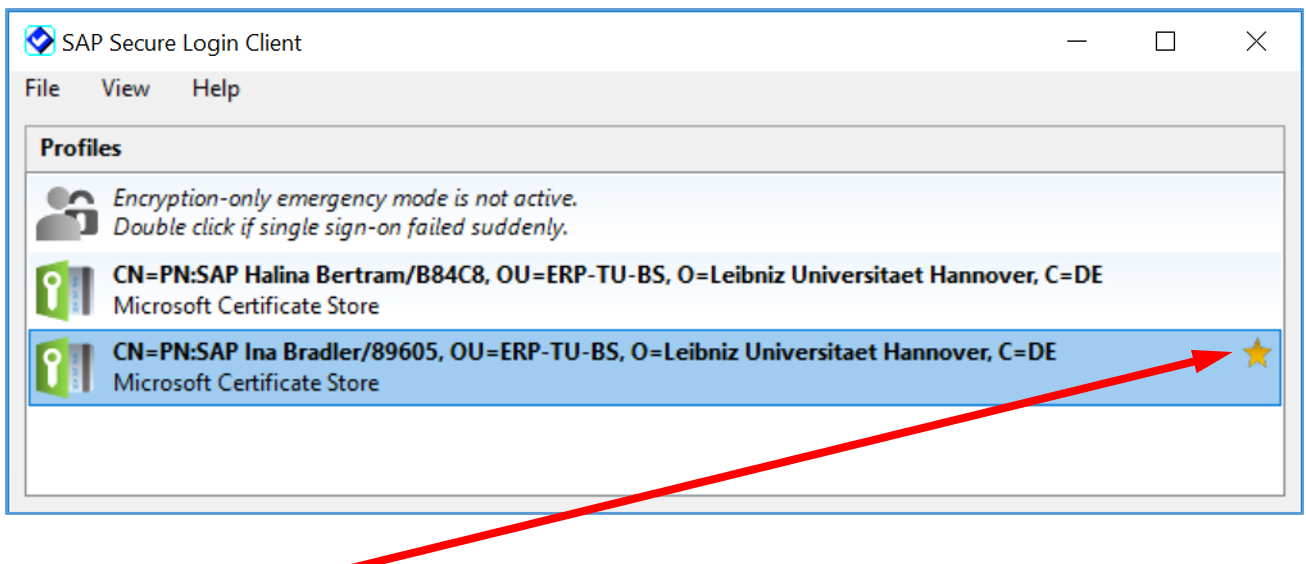
<span style="font-family: 'Arial',sans-serif;">Nach Anklicken erscheint ein Fenster mit einer Reihe von sogenannten Zertifikaten:</span>

<span style="font-family: 'Arial',sans-serif;">[![image.png](https://books.rz.tu-bs.de/uploads/images/gallery/2025-11/scaled-1680-/cyv3iVsDrwfz3PDU-image.png)](https://books.rz.tu-bs.de/uploads/images/gallery/2025-11/cyv3iVsDrwfz3PDU-image.png)</span>

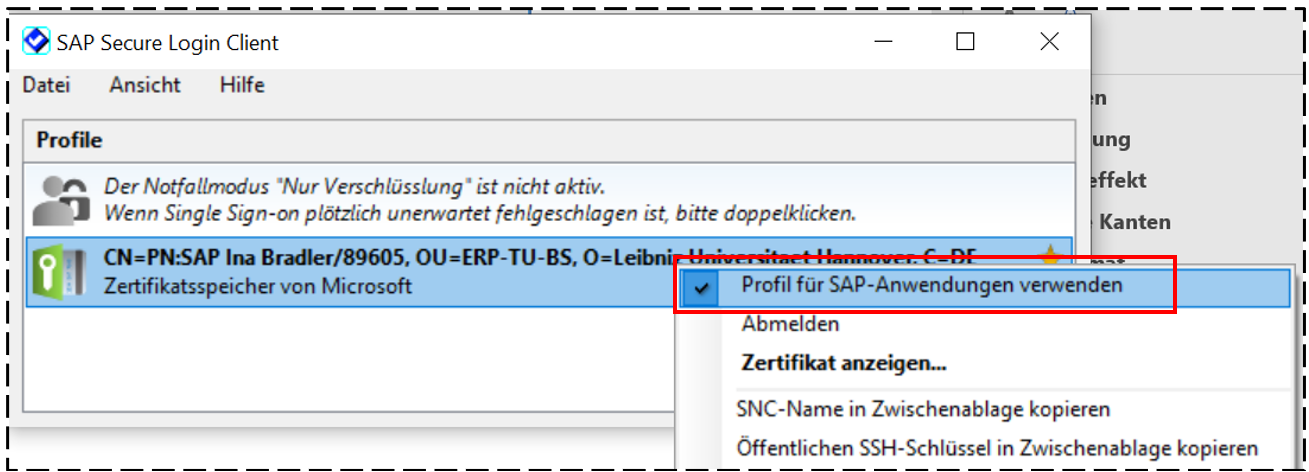
<span style="font-family: 'Arial',sans-serif;">Die Markierung [![image.png](https://books.rz.tu-bs.de/uploads/images/gallery/2025-11/scaled-1680-/1LMpTmfW2sNzc4q7-image.png)](https://books.rz.tu-bs.de/uploads/images/gallery/2025-11/1LMpTmfW2sNzc4q7-image.png)<span style="mso-spacerun: yes;"> </span>bedeutet, dass dieses Zertifikat für SAP verwendet wird. Ist kein Zertifikat markiert oder soll ein anderes Zertifikat verwendet werden, so ist dieses mit der **<u>rechten</u> Maustaste** anzuklicken und aus dem folgenden Menü der Punkt ***Profil für SAP-Anwendung verwenden*** auszuwählen:</span>

<span style="font-family: 'Arial',sans-serif;">[![image.png](https://books.rz.tu-bs.de/uploads/images/gallery/2025-11/scaled-1680-/ejM1MmMos8kt8Exh-image.png)](https://books.rz.tu-bs.de/uploads/images/gallery/2025-11/ejM1MmMos8kt8Exh-image.png)</span>

Diese Einstellung wird im Windows-Profil des gerade am Rechner angemeldeten Benutzers gespeichert.

Auf dem Desktop befindet sich der Icon<span style="mso-no-proof: yes;"><span style="mso-spacerun: yes;"> "SAP-Logon 64": </span></span>![image.png](https://books.rz.tu-bs.de/uploads/images/gallery/2025-11/scaled-1680-/cVToagteZOXAY9gL-image.png)

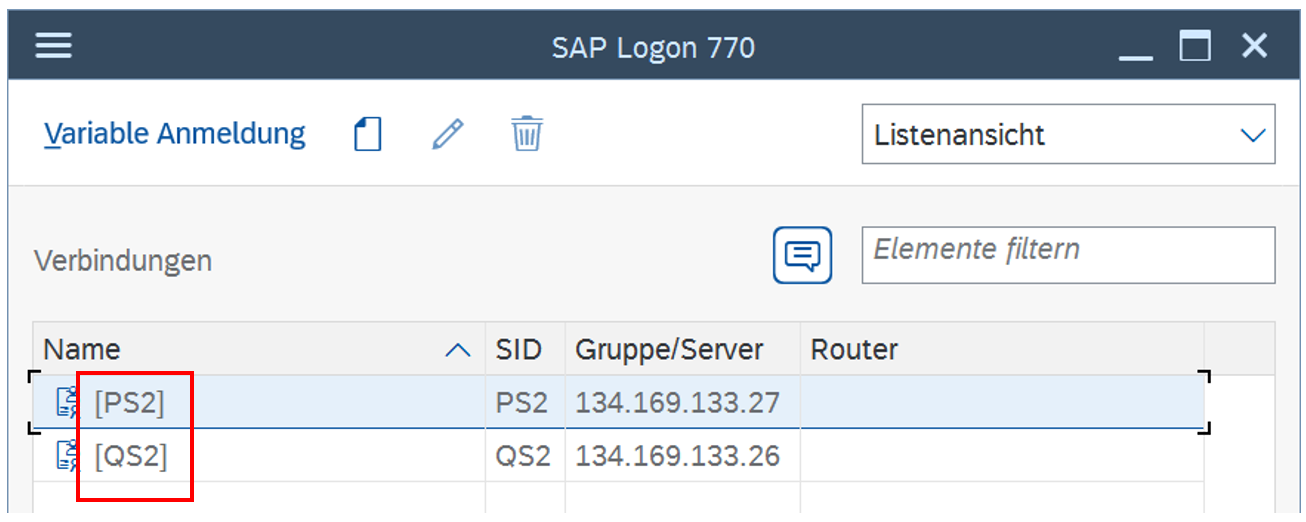
<span style="mso-no-proof: yes;"><span style="mso-spacerun: yes;"> </span></span>Nach Doppelklick darauf werden die SAP-Systeme **PS2** und **QS2** zur Auswahl angeboten:

<span style="font-family: 'Arial',sans-serif;">[![image.png](https://books.rz.tu-bs.de/uploads/images/gallery/2025-11/scaled-1680-/IpiSHZlZmPAHu2cK-image.png)](https://books.rz.tu-bs.de/uploads/images/gallery/2025-11/IpiSHZlZmPAHu2cK-image.png)</span>

**<span style="font-family: 'Arial',sans-serif;">PS2</span>**<span style="font-family: 'Arial',sans-serif;"> ist das Produktivsystem. Es enthält alle echten Daten und ist tagesaktuell.</span><span style="mso-no-proof: yes;"> </span>

**<span style="font-family: 'Arial',sans-serif;">QS2</span>**<span style="font-family: 'Arial',sans-serif;"> ist das sogenannte Qualitätssicherungssystem. Dabei handelt es sich um mehrere Kopien des Produktivsystems zu früheren Zeitpunkten. Es enthält also ebenfalls echte Daten – allerdings nicht tagesaktuell – und ist für Tests und Übungszwecke gedacht.</span>

<span style="font-family: 'Arial',sans-serif;">Für die Schulung nutzen wir das QS2. </span>

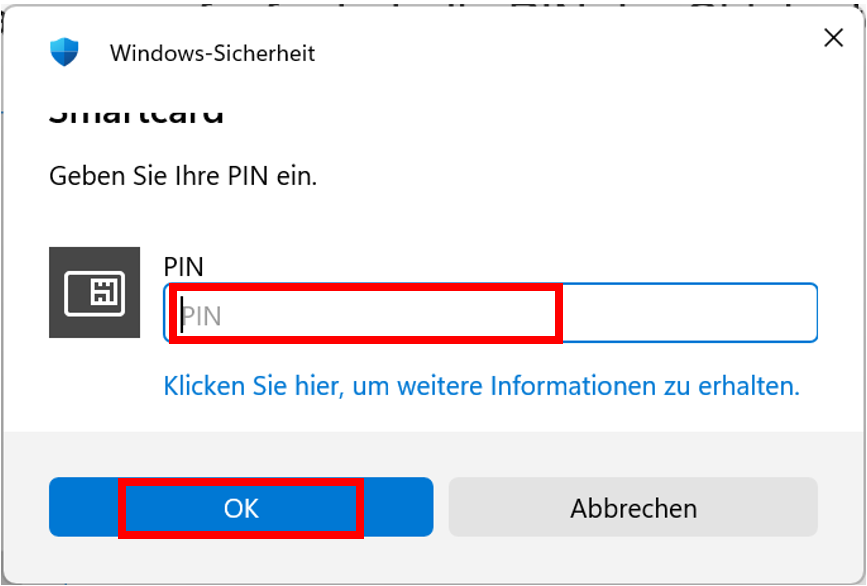
<span style="font-family: 'Arial',sans-serif;">Nach **Doppelklick auf QS2** wird man nun aufgefordert, die PIN der Chipkarte einzugeben:</span>

<span style="font-family: 'Arial',sans-serif;">[![image.png](https://books.rz.tu-bs.de/uploads/images/gallery/2025-11/scaled-1680-/l8bLCCxPPJZs6zdb-image.png)](https://books.rz.tu-bs.de/uploads/images/gallery/2025-11/l8bLCCxPPJZs6zdb-image.png)</span>

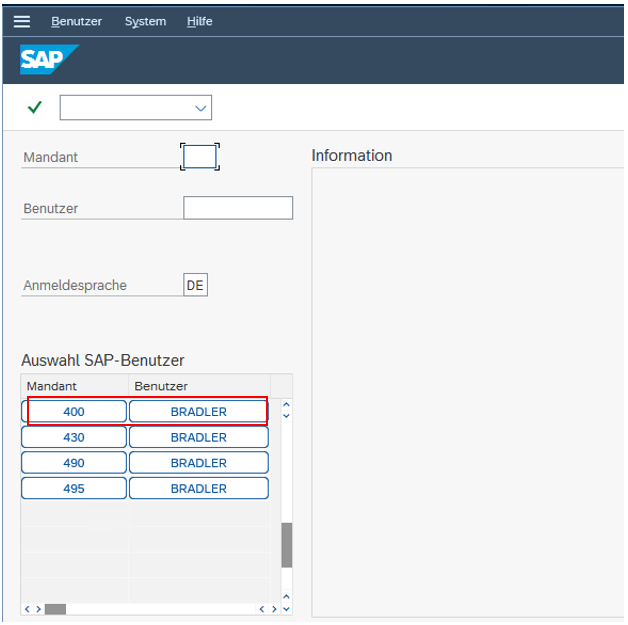
<span style="font-family: 'Arial',sans-serif;">Danach muss ggf. der SAP-Benutzer ausgewählt werden:</span>

[![image.png](https://books.rz.tu-bs.de/uploads/images/gallery/2025-11/scaled-1680-/81jX8308qGjRIB6q-image.png)](https://books.rz.tu-bs.de/uploads/images/gallery/2025-11/81jX8308qGjRIB6q-image.png)

<span style="font-family: 'Arial',sans-serif;">Bei den Mandanten 400, 430, 490 und 495 handelt es sich um Kopien des Produktivsystems zu verschiedenen Zeitpunkten.</span>

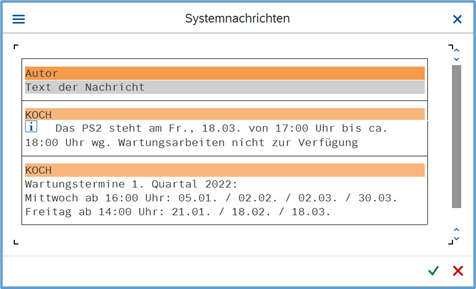
<span style="font-family: 'Arial',sans-serif;">Einmal täglich erscheint zuerst eine Systemnachricht, die über Wartungstermine, Neuerungen o.ä.<span style="mso-spacerun: yes;"> </span>informiert:</span>

[![image.png](https://books.rz.tu-bs.de/uploads/images/gallery/2025-11/scaled-1680-/HGCxo5F8KzrCr0Qs-image.png)](https://books.rz.tu-bs.de/uploads/images/gallery/2025-11/HGCxo5F8KzrCr0Qs-image.png)

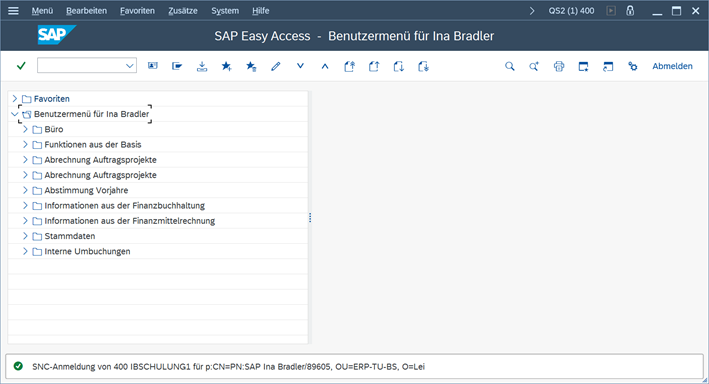
<span style="font-family: 'Arial',sans-serif;">Nach Anklicken von </span>[![image.png](https://books.rz.tu-bs.de/uploads/images/gallery/2025-11/scaled-1680-/jjLLAc6Y9PLt2GyW-image.png)](https://books.rz.tu-bs.de/uploads/images/gallery/2025-11/jjLLAc6Y9PLt2GyW-image.png)<span style="font-family: 'Arial',sans-serif;"><span style="mso-spacerun: yes;"> </span>oder</span> [![image.png](https://books.rz.tu-bs.de/uploads/images/gallery/2025-11/scaled-1680-/O6c9RptLkSy7eUoG-image.png)](https://books.rz.tu-bs.de/uploads/images/gallery/2025-11/O6c9RptLkSy7eUoG-image.png)<span style="font-family: 'Arial',sans-serif;">oder Betätigen von **Enter** erscheint das eigentliche SAP-Menü-Fenster:</span>

[![image.png](https://books.rz.tu-bs.de/uploads/images/gallery/2025-11/scaled-1680-/8KhQ12ukfhUqFXr6-image.png)](https://books.rz.tu-bs.de/uploads/images/gallery/2025-11/8KhQ12ukfhUqFXr6-image.png)

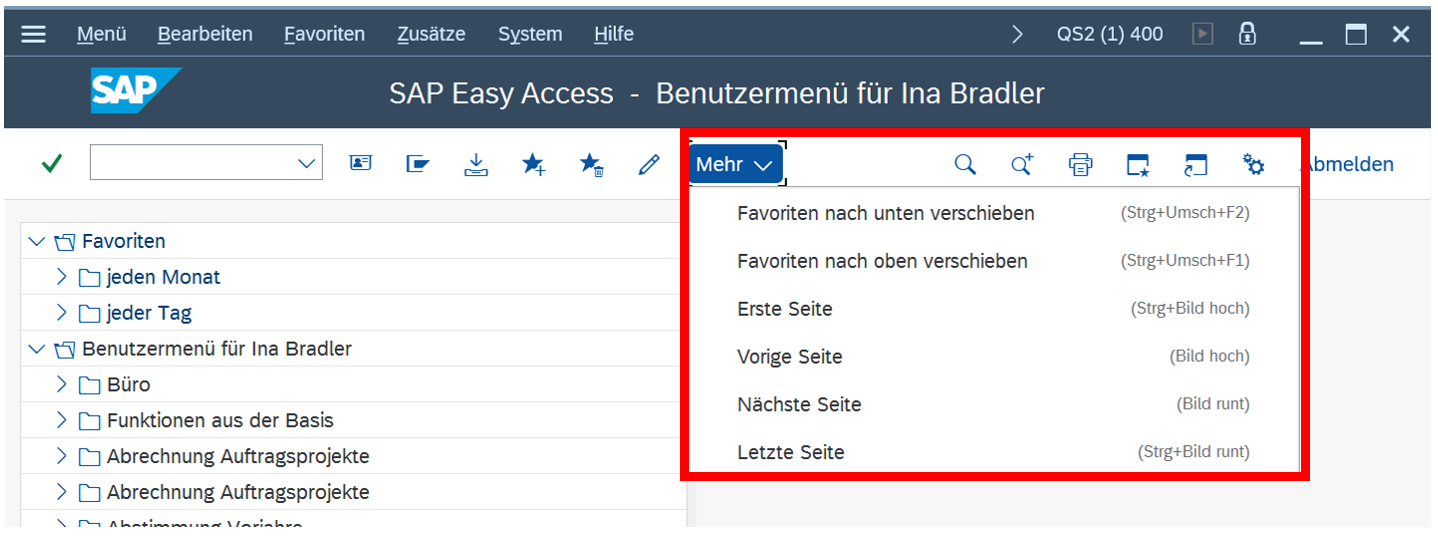
<span style="font-family: 'Arial',sans-serif;">Der Aufbau dieses Fensters entspricht den üblichen Windows-Gepflogenheiten. Wenn das Fenster so schmal ist, dass nicht alle Buttons Platz haben, werden einige Buttons ausgeblendet und sind in einem Menü mit der Bezeichnung</span>[![image.png](https://books.rz.tu-bs.de/uploads/images/gallery/2025-11/scaled-1680-/gbgGUCqFW286hqza-image.png)](https://books.rz.tu-bs.de/uploads/images/gallery/2025-11/gbgGUCqFW286hqza-image.png)<span style="font-family: 'Arial',sans-serif;"><span style="mso-spacerun: yes;"> </span>zu finden:</span>

[![image.png](https://books.rz.tu-bs.de/uploads/images/gallery/2025-11/scaled-1680-/DHjSPSqtdfKBwWEI-image.png)](https://books.rz.tu-bs.de/uploads/images/gallery/2025-11/DHjSPSqtdfKBwWEI-image.png)

# 2.2 Navigieren im Benutzermenü

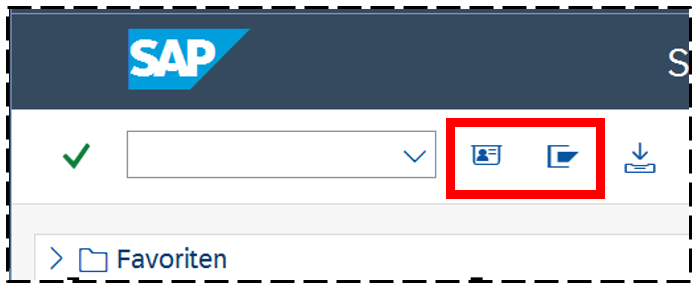
<span style="font-family: 'Arial',sans-serif;">In SAP ERP werden zwei Menüs unterschieden: </span>

[![image.png](https://books.rz.tu-bs.de/uploads/images/gallery/2025-11/scaled-1680-/GWP34Tq2qGsm1B5q-image.png)](https://books.rz.tu-bs.de/uploads/images/gallery/2025-11/GWP34Tq2qGsm1B5q-image.png)

[![image.png](https://books.rz.tu-bs.de/uploads/images/gallery/2025-11/scaled-1680-/ZS2NekMxAkXCUCh6-image.png)](https://books.rz.tu-bs.de/uploads/images/gallery/2025-11/ZS2NekMxAkXCUCh6-image.png)<span style="font-family: 'Arial',sans-serif;"><span style="mso-spacerun: yes;"> </span>das benutzerspezifische Menü - es enthält nur die Einträge, die Sie für Ihre tägliche Arbeit benötigen und für die Sie Berechtigungen haben</span>

[![image.png](https://books.rz.tu-bs.de/uploads/images/gallery/2025-11/scaled-1680-/4DEAUC6NQgQxJDYz-image.png)](https://books.rz.tu-bs.de/uploads/images/gallery/2025-11/4DEAUC6NQgQxJDYz-image.png)<span style="font-family: 'Arial',sans-serif;">das SAP-Easy-Access-Menü – es enthält alle verfügbaren Menüpunkte des SAP-Systems</span>

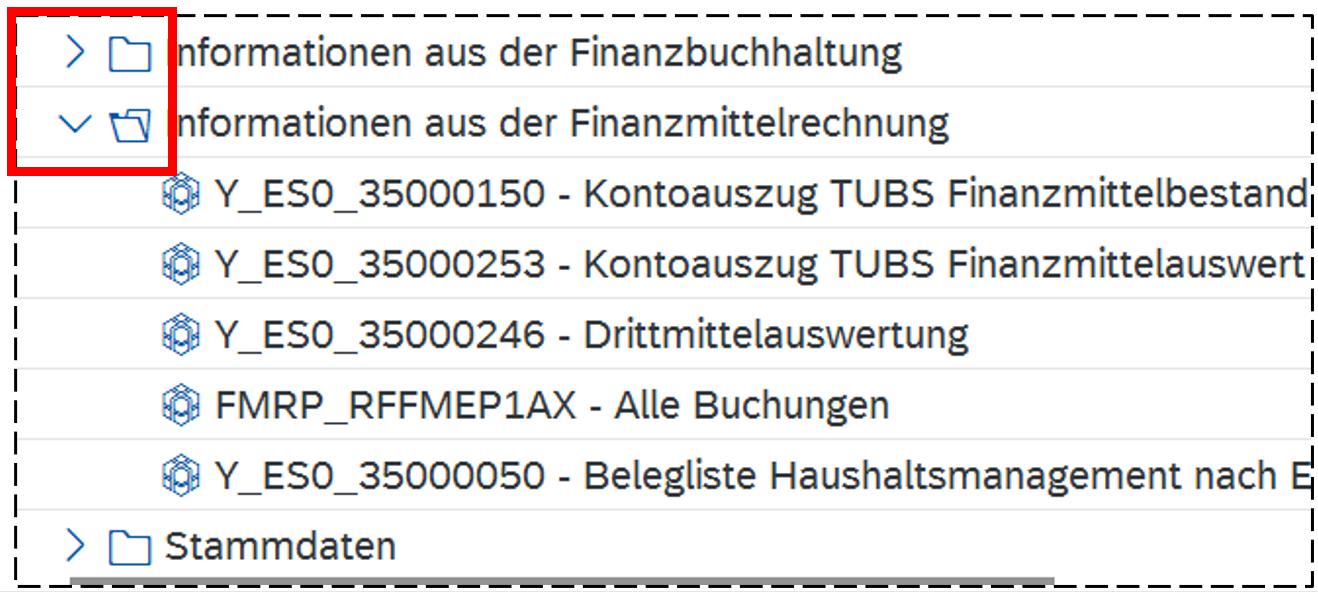
<span style="font-family: 'Arial',sans-serif;">Ein<span style="mso-spacerun: yes;"> </span></span>[![image.png](https://books.rz.tu-bs.de/uploads/images/gallery/2025-11/scaled-1680-/tDJk7XDDG0MI2ojZ-image.png)](https://books.rz.tu-bs.de/uploads/images/gallery/2025-11/tDJk7XDDG0MI2ojZ-image.png)<span style="font-family: 'Arial',sans-serif;"><span style="mso-spacerun: yes;"> </span>vor der Zeile im Menü kennzeichnet, dass weitere Unterpunkte vorhanden sind, die durch Klicken auf das Zeichen sichtbar<span style="mso-spacerun: yes;"> </span>werden; anschließend weist der Pfeil nach unten. Durch Klicken auf dieses Zeichen können die Teilmenüs wieder geschlossen werden.</span>

[![image.png](https://books.rz.tu-bs.de/uploads/images/gallery/2025-11/scaled-1680-/A450v16Tqy7vkTMx-image.png)](https://books.rz.tu-bs.de/uploads/images/gallery/2025-11/A450v16Tqy7vkTMx-image.png)

<span style="font-family: 'Arial',sans-serif;"><span style="mso-spacerun: yes;"> </span></span>[![image.png](https://books.rz.tu-bs.de/uploads/images/gallery/2025-11/scaled-1680-/Ei5QSobXBoJhkJon-image.png)](https://books.rz.tu-bs.de/uploads/images/gallery/2025-11/Ei5QSobXBoJhkJon-image.png)<span style="font-family: 'Arial',sans-serif;"> ist das Symbol für einen Bericht. Bericht ausführen erfolgt durch Doppelklicken auf die Zeile oder Entertaste oder Menü *Bearbeiten – Ausführen* oder F2 oder rechte Maustaste + *Ausführen*.</span>

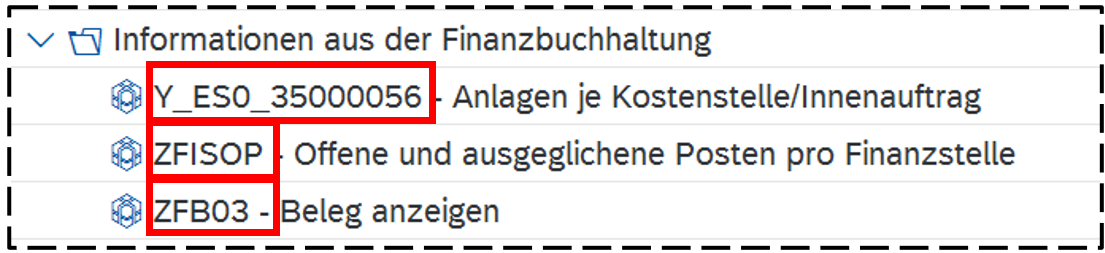
<span style="font-family: 'Arial',sans-serif;">Zu jedem Bericht gehört ein sogenannter „Transaktionscode“, der i.d.R. vor dem Berichtsnamen steht:</span>

[![image.png](https://books.rz.tu-bs.de/uploads/images/gallery/2025-11/scaled-1680-/oGvxfsdZ9VEjFbo7-image.png)](https://books.rz.tu-bs.de/uploads/images/gallery/2025-11/oGvxfsdZ9VEjFbo7-image.png)

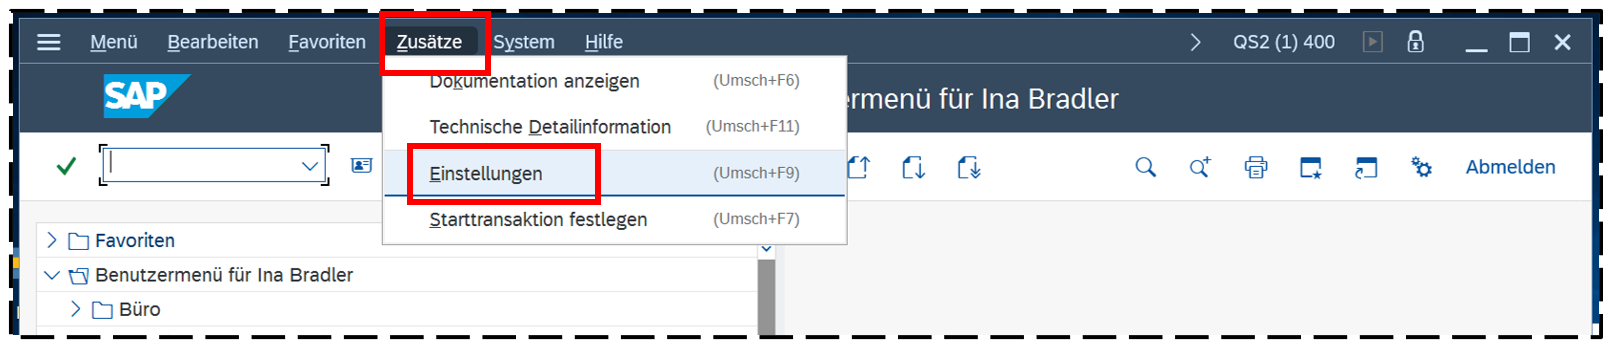
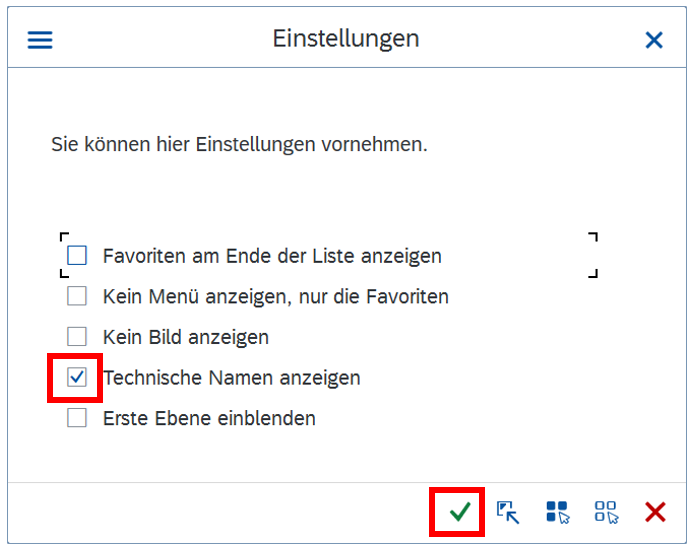
<details id="bkmrk-anmerkung%3A-sollte-de"><summary>Anmerkung: Sollte der Transaktionscode nicht angezeigt sein, kann er über den Menüpunkt Zusätze - Einstellungen eingeblendet werden:</summary>

[![image.png](https://books.rz.tu-bs.de/uploads/images/gallery/2025-11/scaled-1680-/DSucr5CjMzGO8dr1-image.png)](https://books.rz.tu-bs.de/uploads/images/gallery/2025-11/DSucr5CjMzGO8dr1-image.png)

[![image.png](https://books.rz.tu-bs.de/uploads/images/gallery/2025-11/scaled-1680-/B1Z1BkgCZpC7vr3w-image.png)](https://books.rz.tu-bs.de/uploads/images/gallery/2025-11/B1Z1BkgCZpC7vr3w-image.png)
</details><span style="mso-ignore: vglayout; position: absolute; z-index: 251672576; left: 0px; margin-left: 17px; margin-top: 10px; width: 10px; height: 517px;">![](file:///C:/Users/ibradler/AppData/Local/Temp/msohtmlclip1/01/clip_image001.png)</span>

<span style="font-family: 'Arial',sans-serif;">Man kann den Transaktionscodes im Befehlsfeld der Symbolleiste eingeben und anschließend auf<span style="mso-spacerun: yes;"> [![image.png](https://books.rz.tu-bs.de/uploads/images/gallery/2025-11/scaled-1680-/jjLLAc6Y9PLt2GyW-image.png)](https://books.rz.tu-bs.de/uploads/images/gallery/2025-11/jjLLAc6Y9PLt2GyW-image.png) </span></span><span style="font-family: 'Arial',sans-serif;">klicken<span style="mso-spacerun: yes;"> </span>bzw. ENTER betätigen. Dann wird der entsprechende Bericht ebenfalls aufgerufen, z.B.<span style="mso-spacerun: yes;"> </span>ZFISOP für die „Offene-Posten-Liste“:</span>

<span style="font-family: 'Arial',sans-serif;">[![image.png](https://books.rz.tu-bs.de/uploads/images/gallery/2025-11/scaled-1680-/JGjAS8PBzIGA2yuL-image.png)](https://books.rz.tu-bs.de/uploads/images/gallery/2025-11/JGjAS8PBzIGA2yuL-image.png)</span>

<span style="font-family: 'Arial',sans-serif;">Im SAP-Benutzermenü kann man eine **Favoritenliste** erstellen, die alle Berichte, Transaktionen etc. aufnimmt, die Sie am häufigsten benötigen:</span>

[![image.png](https://books.rz.tu-bs.de/uploads/images/gallery/2025-11/scaled-1680-/TQIDijCdWeAiW7Kx-image.png)](https://books.rz.tu-bs.de/uploads/images/gallery/2025-11/TQIDijCdWeAiW7Kx-image.png)

<span style="font-family: 'Arial',sans-serif;">Am einfachsten lässt sich die Favoritenliste mit „Drag &amp; Drop“ zusammenstellen: den gewünschten Eintrag anklicken, die linke Maustaste gedrückt halten, den Eintrag an die gewünschte Stelle in der Favoritenliste ziehen und durch Loslassen der linken Maustaste dort fallen lassen. </span>

<span style="font-family: 'Arial',sans-serif;">Man kann unter Favoriten auch **eigene Ordner** anlegen und die Berichte etc. darin einsortieren. Dazu mit der <u>rechten Maustaste</u> auf *Favoriten* klicken und dann *Ordner einfügen* auswählen:</span>

[![image.png](https://books.rz.tu-bs.de/uploads/images/gallery/2025-11/scaled-1680-/Y5PqaPl9S6kgq0gy-image.png)](https://books.rz.tu-bs.de/uploads/images/gallery/2025-11/Y5PqaPl9S6kgq0gy-image.png)

# 2.3 Abmeldung aus SAP ERP

<span style="font-family: 'Arial',sans-serif;">Dazu klickt man<span style="mso-spacerun: yes;"> </span></span>[![image.png](https://books.rz.tu-bs.de/uploads/images/gallery/2025-11/scaled-1680-/j6ptrVsnn7JcQ5Lx-image.png)](https://books.rz.tu-bs.de/uploads/images/gallery/2025-11/j6ptrVsnn7JcQ5Lx-image.png)<span style="font-family: 'Arial',sans-serif;"><span style="mso-spacerun: yes;"> </span>oder [![image.png](https://books.rz.tu-bs.de/uploads/images/gallery/2025-11/scaled-1680-/7yfYvCYUQweD4YIJ-image.png)](https://books.rz.tu-bs.de/uploads/images/gallery/2025-11/7yfYvCYUQweD4YIJ-image.png) :</span>

[![image.png](https://books.rz.tu-bs.de/uploads/images/gallery/2025-11/scaled-1680-/yXzTRA1rdaC1B3iF-image.png)](https://books.rz.tu-bs.de/uploads/images/gallery/2025-11/yXzTRA1rdaC1B3iF-image.png)

<span style="font-family: 'Arial',sans-serif;">und bestätigt die folgende Frage mit „Ja“:</span>

[![image.png](https://books.rz.tu-bs.de/uploads/images/gallery/2025-11/scaled-1680-/4yXdfW21xS84JqaQ-image.png)](https://books.rz.tu-bs.de/uploads/images/gallery/2025-11/4yXdfW21xS84JqaQ-image.png)

<span style="font-family: 'Arial',sans-serif;">Das Beenden/Verlassen ist auch über den Menüpunkt *System* - *Abmelden* möglich:</span>

[![image.png](https://books.rz.tu-bs.de/uploads/images/gallery/2025-11/scaled-1680-/K0CoAaWjmrEAy7OO-image.png)](https://books.rz.tu-bs.de/uploads/images/gallery/2025-11/K0CoAaWjmrEAy7OO-image.png)

<span style="font-family: 'Arial',sans-serif;">Das ist besonders dann sinnvoll, wenn man in SAP mehrere Modi (SAP-Fenster) geöffnet hatte - in einem Arbeitsschritt werden alle Anwendungen geschlossen. </span>